Nadmi
- Kraj:Polska
- : Język.:deutsch
- : Utworzony.: 06-10-15
- : Ostatnie Logowanie.: 21-07-26


: Opis.: Grób Obelisk zlokalizowany w Petrze w Jordanii. Jest to starożytny grobowiec i sala pogrzebowa wyrzeźbione w skale z piaskowca w I wieku naszej ery. Górna część to sam grobowiec, a dolna to triclinium zwane Bab Al-Siq. Triclinium to pomieszczenie lub sala do przeprowadzania obrzędów pogrzebowych lub uczt upamiętniających zmarłych. Głównymi cechami, które się wyróżniają, są cztery filary, od których pochodzi nazwa budynku. Pomiędzy tymi filarami znajduje się rzeźba postaci i uważa się, że razem te pięć odrębnych cech reprezentuje pięć osób pochowanych wewnątrz. Komora grobowa Grobowca Obelisku mierzy 5,91 m szerokości, 5,69 m długości i 3,95 m wysokości. Obelisk-Grab in Petra, Jordanien. Es ist eine alte Grab- und Bestattungshalle, die im 1. Jahrhundert n. Chr. aus Sandsteinfelsen gehauen wurde. Der obere Teil ist das Grab selbst und der untere Teil ist ein Triklinium namens Bab Al-Siq. Ein Triklinium ist ein Raum oder eine Halle, in der Beerdigungszeremonien oder Feste zum Gedenken an die Verstorbenen abgehalten werden. Auffällig sind vor allem die vier Säulen, die dem Gebäude seinen Namen gegeben haben. Zwischen diesen Säulen befindet sich eine Figurenskulptur und es wird angenommen, dass diese fünf verschiedenen Merkmale zusammen die fünf darin begrabenen Menschen darstellen. Die Grabkammer des Obeliskengrabes ist 5,91 m breit, 5,69 m lang und 3,95 m hoch. Гробница-обелиск, расположенная в Петре, Иордания. Это древняя гробница и погребальный зал, вырезанные из песчаника в I веке нашей эры. Верхняя часть - это сама гробница, а нижняя часть - триклиний под названием Баб Аль-Сик. Триклиний - это комната или зал для проведения поминальных церемоний или застолий в память о погибших. Основными особенностями, которые выделяются, являются четыре колонны, которые дали название зданию. Между этими колоннами находится фигурная скульптура, и считается, что вместе эти пять отличительных черт представляют пять человек, похороненных внутри. Гробница гробницы обелиска имеет ширину 5,91 м, длину 5,69 м и высоту 3,95 м. Obelisk tomb located in Petra, Jordan. It is an ancient tomb and funeral hall carved out of sandstone rock in the 1st century AD. The upper part is the tomb itself, and the lower part is a triclinium called Bab Al-Siq. A triclinium is a room or hall for holding funeral ceremonies or feasts in memory of the dead. The main features that stand out are the four pillars that gave the building its name. Between these pillars is a figure sculpture and it is believed that together these five distinct features represent the five people buried inside. The tomb chamber of the Obelisk Tomb is 5.91 m wide, 5.69 m long and 3.95 m high.
: Data Publikacji.: 05-07-26
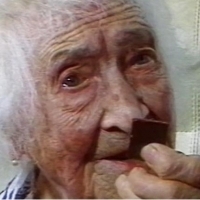
: Opis.: Nagasaki, 20 minut po bombardowaniu atomowym w 1945 roku. Nagasaki, 20 minut po bombardowaniu atomowym w 1945 roku. Moim zdaniem ta fotka jest ,,wyprodukowana,, w obecnych czasach. Bo akurat stał tam fotograf i zdążył zrobić fotkę ... i rozbłysk wybuchu nie oślepił go ? I jeszcze taśma światłoczuła wytrzymała promieniowanie z takiej bliskiej odległości ... no i gdzie efekt fali uderzeniowej i cieplnej ? dokładnie a stal topi się w promieniu 5 km przy takiej tepraturze.. Nagasaki, 20 minutes after the 1945 nuclear bombing. In my opinion, this photo is "produced" nowadays. Because there was just a photographer standing there and he had time to take a photo ... and the flare of the explosion didn't blind him? And the photosensitive tape withstood radiation from such a close distance ... and where is the effect of shock and heat waves? exactly, and the steel melts within a 5 km radius at this temperature .. Нагасаки, через 20 минут после ядерной бомбардировки 1945 года. На мой взгляд, это фото «производят» сейчас. Потому что там стоял просто фотограф и у него было время сфотографировать ... и вспышка взрыва не ослепила его? И светочувствительная лента выдерживала излучение с такого близкого расстояния ... а где же влияние ударной волны и тепловой волны? точно, и при этой температуре сталь плавится в радиусе 5 км .. Nagasaki, 20 Minuten nach dem Atombombenabwurf 1945. Meiner Meinung nach wird dieses Foto heutzutage "produziert". Weil da nur ein Fotograf stand und er Zeit hatte, ein Foto zu machen ... und das Aufflackern der Explosion ihn nicht blendete? Und das lichtempfindliche Band hielt Strahlung aus so kurzer Entfernung stand ... und wo ist die Wirkung der Stoß- und Hitzewelle? genau, und der Stahl schmilzt bei dieser Temperatur im Umkreis von 5 km.
: Data Publikacji.: 05-07-26
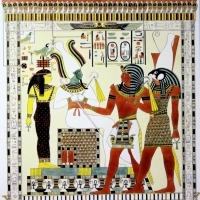
: Opis.: Zenobia była królową imperium palmireńskiego w Syrii. Ta starożytna królowa Palmyry podbiła Egipt, zdobyła rzymskie prowincje i prawie przekształciła swoje królestwo w imperium równe Rzymowi. – Po tym, jak jej mąż Odaenatus został zamordowany w 267 lub 268 roku, Zenobia została regentką swojego własnego młodego syna Vaballathusa. „W 269 podbiła Egipt, następnie podbiła znaczną część Azji Mniejszej i ogłosiła swoją niezależność od Rzymu. – Jednak rzymski cesarz „Aurelian” pokonał jej armie pod Antakyą w Turcji, Himsem w Syrii i oblegał Palmyrę. Zenobia i Vaballathus zostali schwytani, a Palmyreńczycy wkrótce się poddali. Według historyków Zenobia zagłodziła się na śmierć podczas podróży do Rzymu. Zenobia war die Königin des Palmirenreiches in Syrien. Diese alte Königin von Palmyra eroberte Ägypten, eroberte die römischen Provinzen und verwandelte ihr Königreich fast in ein Reich, das Rom gleichkam. - Nachdem ihr Mann Odaenatus 267 oder 268 n. Chr. ermordet wurde, wurde Zenobia Regentin ihres eigenen kleinen Sohnes Vaballathus. „Im Jahr 269 eroberte sie Ägypten, dann eroberte sie einen Großteil Kleinasiens und erklärte ihre Unabhängigkeit von Rom. - Allerdings besiegte der römische Kaiser "Aurelian" ihre Armeen bei Antakya in der Türkei, Homs in Syrien und belagerte Palmyra. Zenobia und Vaballathus wurden gefangen genommen und die Palmyreer ergaben sich bald. Historikern zufolge verhungerte Zenobia auf einer Reise nach Rom. Зенобия была королевой Империи Пальмирен в Сирии. Эта древняя царица Пальмиры завоевала Египет, захватила римские провинции и почти превратила свое королевство в империю, равную Риму. - После того, как ее муж Одаэнат был убит в 267 или 268 году нашей эры, Зенобия стала регентом своего собственного маленького сына Вабаллата. «В 269 году она завоевала Египет, затем завоевала большую часть Малой Азии и провозгласила независимость от Рима. - Однако римский император Аврелиан разбил ее армии при Антакье в Турции, Хомсе в Сирии и осадил Пальмиру. Зенобия и Вабаллат были схвачены, и пальмирейцы вскоре сдались. По мнению историков, Зенобия умерла от голода во время поездки в Рим. Zenobia was the queen of the Palmiren Empire in Syria. This ancient queen of Palmyra conquered Egypt, captured the Roman provinces, and almost turned her kingdom into an empire equal to Rome. - After her husband Odaenatus was murdered in AD 267 or 268, Zenobia became regent of her own young son Vaballathus. “In 269 she conquered Egypt, then she conquered much of Asia Minor and declared her independence from Rome. - However, the Roman emperor "Aurelian" defeated her armies at Antakya in Turkey, Homs in Syria and besieged Palmyra. Zenobia and Vaballathus were captured, and the Palmyreans soon surrendered. According to historians, Zenobia starved to death on a trip to Rome.
: Data Publikacji.: 05-07-26
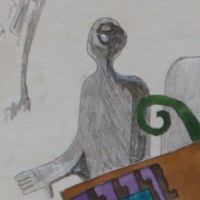
: Opis.: Nawiedzone miasto Khara Khoto. To starożytne miasto położone w zachodniej części Mongolii Wewnętrznej. Nazwa „Khara Khoto” dosłownie oznacza „Czarne Miasto” w języku mongolskim. Miasto zostało założone w 1032 roku przez Tangutów i stało się kwitnącym miastem dzięki położeniu na słynnym Jedwabnym Szlaku. Według legendy, w 1372 roku mongolski generał Khara Bator (Czarny bohater) został otoczony przez wojska chińskiej dynastii Ming w mieście. Chińczycy zmienili kierunek rzeki Ejin, która wypływała poza miasto i była jego jedynym/głównym źródłem wody. – W rezultacie studnie Khary Khoto wkrótce wyschły, a obrońcy zostali zmuszeni do wyboru między śmiercią z pragnienia a śmiercią w walce z oblegającymi wojskami. – W miarę upływu czasu i kiedy Khara Bator zdał sobie sprawę ze swojego losu, zamordował swoją rodzinę, a potem siebie. Po jego samobójstwie żołnierze Khary Bator czekali w twierdzy, aż Ming w końcu zaatakują i zabiją pozostałych mieszkańców. „To prowadzi do pogłosek, że ruiny miasta wciąż są nawiedzane przez duchy poległych żołnierzy mongolskich. Haunted city of Khara Khoto. It is an ancient city located in the western part of Inner Mongolia. The name "Khara Khoto" literally means "Black City" in Mongolian. The city was founded in 1032 by the Tanguts and became a thriving city thanks to its location on the famous Silk Road. According to legend, in 1372 the Mongolian general Khara Bator (Black Hero) was surrounded by the Chinese Ming Dynasty troops in the city. The Chinese changed the direction of the Ejin River, which ran outside the city and was its only / main source of water. As a result, Khara Khoto's wells soon dried up, and the defenders were forced to choose between dying out of thirst or dying to fight the besieging troops. - As time went on and when Khara Bator realized his fate, he murdered his family and then himself. After his suicide, Khara Bator's soldiers waited in the fortress for the Ming to finally attack and kill the rest of the inhabitants. “This leads to rumors that the city ruins are still haunted by the ghosts of fallen Mongol soldiers. Город с привидениями Хара Хото. Это древний город, расположенный в западной части Внутренней Монголии. Название «Хара Хото» буквально означает «Черный город» на монгольском языке. Город был основан в 1032 году тангутами и стал процветающим городом благодаря своему расположению на знаменитом Шелковом пути. Согласно легенде, в 1372 году монгольский генерал Хара Батор (Черный герой) был окружен в городе войсками китайской династии Мин. Китайцы изменили направление реки Эджин, которая протекала за пределами города и была его единственным / основным источником воды. В результате колодцы Кхара Хото вскоре высохли, и защитники были вынуждены выбирать между смертью от жажды или смертью, чтобы сражаться с осаждающими войсками. - Шло время, и когда Хара Батор осознал свою судьбу, он убил свою семью, а затем себя. После его самоубийства солдаты Хара-Батора ждали в крепости, пока Мин наконец атакует и убьет остальных жителей. «Это приводит к слухам, что руины города до сих пор преследуют призраки павших монгольских солдат. Spukstadt Khara Khoto. Es ist eine antike Stadt im westlichen Teil der Inneren Mongolei. Der Name "Khara Khoto" bedeutet auf Mongolisch wörtlich "Schwarze Stadt". Die Stadt wurde 1032 von den Tanguten gegründet und entwickelte sich dank ihrer Lage an der berühmten Seidenstraße zu einer blühenden Stadt. Der Legende nach wurde 1372 der mongolische General Khara Bator (Schwarzer Held) von den Truppen der chinesischen Ming-Dynastie in der Stadt umzingelt. Die Chinesen änderten die Richtung des Ejin-Flusses, der außerhalb der Stadt verlief und seine einzige / wichtigste Wasserquelle war. Infolgedessen trockneten die Brunnen von Khara Khoto bald aus und die Verteidiger mussten sich entscheiden, ob sie vor Durst sterben oder gegen die belagernden Truppen kämpfen mussten. - Im Laufe der Zeit und als Khara Bator sein Schicksal erkannte, ermordete er seine Familie und dann sich selbst. Nach seinem Selbstmord warteten die Soldaten von Khara Bator in der Festung darauf, dass die Ming endlich angreifen und den Rest der Bewohner töten. „Dies führt zu Gerüchten, dass die Ruinen der Stadt immer noch von den Geistern gefallener mongolischer Soldaten heimgesucht werden.
: Data Publikacji.: 05-07-26
© Web Powered by Open Classifieds 2009 - 2026