Nadmi
- Kraj:Polska
- : Język.:deutsch
- : Utworzony.: 06-10-15
- : Ostatnie Logowanie.: 21-07-26


: Opis.: Historia hinduizmu w Rosji sięga co najmniej XVI wieku. Kiedy Astrachań został podbity w 1556 r., mała społeczność indyjska (Marwaris, Sindhis i Pendżabi, którzy handlowali astrachańskimi tkaninami i diamentami) stała się częścią państwa moskiewskiego. Na początku XVIII wieku Piotr Wielki, pierwszy rosyjski cesarz, spotkał się z astrachańskimi hindusami i na ich prośbę zwrócił się do rosyjskiego senatu o wydanie prawa chroniącego wierzenia hinduistów. Było to pierwsze prawo w Rosji chroniące obcą religię. P.S Hinduizm w Rosji jest zdecydowanie starszy, Hindusi po raz pierwszy udali się na rosyjski step w czasach imperium mongolskiego i kolejnych państw tatarskich. W rzeczywistości wiek XVII oznacza upadek hinduizmu w Rosji, ponieważ wraz z upadkiem państw muzułmańskich w regionie, Hindusi nie mieli bezpośredniego związku z ziemią. Ponadto ortodoksyjna polityka Rosji zniechęciła niechrześcijan do zamieszkania tam i zmniejszyła handel ze Wschodem. Tales of India Opowieści z Indii Die Geschichte des Hinduismus in Russland reicht mindestens bis ins 16. Jahrhundert zurück. Als Astrachan 1556 erobert wurde, wurde eine kleine indische Gemeinschaft (Marwaris, Sindhis und Punjabi, die mit Astrachan-Stoffen und Diamanten handelten) Teil des Moskauer Staates. Zu Beginn des 18. Jahrhunderts traf sich Peter der Große, der erste russische Kaiser, mit den Hindus von Astrachan und bat den russischen Senat, ein Gesetz zum Schutz des hinduistischen Glaubens zu verabschieden. Es war das erste Gesetz in Russland, das eine ausländische Religion schützte. PS Der Hinduismus in Russland ist definitiv älter, die Hindus gingen zum ersten Mal während des Mongolenreichs und der nachfolgenden Tatarenstaaten in die russische Steppe. Tatsächlich markiert das 17. Jahrhundert den Niedergang des Hinduismus in Russland, denn mit dem Zusammenbruch der muslimischen Staaten in der Region hatten die Hindus keine direkte Verbindung zum Land. Außerdem hielt Russlands orthodoxe Politik Nichtchristen davon ab, dort zu leben, und reduzierte den Handel mit dem Osten. Geschichten aus Indien История индуизма в России восходит как минимум к 16 веку. Когда в 1556 году была завоевана Астрахань, небольшая индийская община (марвари, синдхи и пенджаби, торговавшие астраханскими тканями и алмазами) стала частью Московского государства. В начале XVIII века первый российский император Петр Великий встретился с астраханскими индусами и по их просьбе попросил Сенат России принять закон о защите индуистских верований. Это был первый в России закон, защищавший иностранную религию. P.S Индуизм в России определенно старше, индусы впервые попали в российские степи во времена Монгольской империи и последующих татарских государств. Фактически, 17 век знаменует падение индуизма в России, потому что с распадом мусульманских государств в регионе индуисты не имели прямой связи с землей. Кроме того, ортодоксальная политика России не позволяла нехристианам жить там и сокращала торговлю с Востоком. Сказки Индии The history of Hinduism in Russia goes back to at least the 16th century. When Astrakhan was conquered in 1556, a small Indian community (Marwaris, Sindhis and Punjabi who traded in Astrakhan fabrics and diamonds) became part of the Moscow State. At the beginning of the 18th century, Peter the Great, the first Russian emperor, met with the Astrakhan Hindus and, at their request, asked the Russian Senate to pass a law to protect Hindu beliefs. It was the first law in Russia to protect a foreign religion. P.S Hinduism in Russia is definitely older, the Hindus went to the Russian steppe for the first time during the Mongol Empire and subsequent Tatar states. In fact, the 17th century marks the fall of Hinduism in Russia because with the collapse of the Muslim states in the region, the Hindus had no direct relationship with the land. In addition, Russia's orthodox policy discouraged non-Christians from living there and reduced trade with the East. Tales of India
: Data Publikacji.: 15-07-26
: Opis.: Kopalnia diamentów w Rosji. Kopalnia Mir, zwana również kopalnią Mirny, to odkrywkowa kopalnia diamentów zlokalizowana w Mirnym w Republice Sacha, w syberyjskim regionie wschodniej Rosji. Kopalnia ma głębokość ponad 525 metrów (4 miejsce na świecie), ma średnicę 1200 m i jest jedną z największych wykopanych dziur na świecie. Diamond mine in Russia. The Mir mine, also known as the Mirny mine, is an opencast diamond mine located in Mirny in the Republic of Sakha, in the Siberian region of eastern Russia. The mine is over 525 meters deep (4th place in the world), has a diameter of 1,200 meters and is one of the largest dug holes in the world. Алмазный рудник в России. Рудник Мир, также известный как рудник Мирный, представляет собой открытый алмазный рудник, расположенный в Мирном в Республике Саха в Сибирском регионе на востоке России. Рудник имеет глубину более 525 метров (4-е место в мире), имеет диаметр 1 200 метров и является одним из самых больших раскопанных ям в мире. Diamantenmine in Russland. Die Mir-Mine, auch Mirny-Mine genannt, ist eine Tagebau-Diamantmine in Mirny in der Republik Sacha in der sibirischen Region Ostrussland. Die Mine ist über 525 Meter tief (4. Platz weltweit), hat einen Durchmesser von 1.200 Metern und ist eines der größten gegrabenen Löcher der Welt.
: Data Publikacji.: 15-07-26
: Opis.: Standardy urody zmieniają się z roku na rok, dlatego kobiety w średniowieczu wyglądały zupełnie inaczej niż dzisiaj. Dziś dziewczyny wydają fortuny na podkreślenie rzęs i brwi, ale jeszcze kilka wieków temu wszystko było zupełnie inaczej. Rzęsy i brwi kobiety zostały wyrwane, aby podkreślić czystość jej twarzy. Niektóre wyrywały sobie włosy, aby uzyskać idealnie owalną twarz. Schönheitsstandards ändern sich von Jahr zu Jahr, weshalb Frauen im Mittelalter ganz anders aussahen als heute. Heute geben Mädchen ein Vermögen aus, um Wimpern und Augenbrauen zu betonen, aber vor einigen Jahrhunderten war alles ganz anders. Die Wimpern und Augenbrauen der Frau wurden herausgezupft, um die Reinheit ihres Gesichts zu betonen. Manche rissen sich die Haare aus, um ein perfekt ovales Gesicht zu bekommen. Стандарты красоты меняются из года в год, поэтому женщины в средние века выглядели совершенно иначе, чем сегодня. Сегодня девушки тратят целые состояния на подчеркивание ресниц и бровей, но несколько веков назад все было совершенно иначе. Ресницы и брови женщины были выщипаны, чтобы подчеркнуть чистоту лица. Некоторые вырвали волосы, чтобы получилось идеально овальное лицо. Beauty standards change from year to year, which is why women in the Middle Ages looked completely different than today. Today, girls spend fortunes on emphasizing eyelashes and eyebrows, but a few centuries ago everything was completely different. The woman's eyelashes and eyebrows have been plucked out to emphasize the purity of her face. Some plucked their hair out to get a perfectly oval face.
: Data Publikacji.: 14-07-26
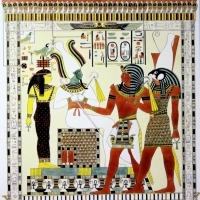
: Opis.: Badając religię sumeryjską, naukowcy z Uniwersytetu w Kopenhadze odkryli mutację genetyczną, która wydarzyła się około 6 000 do 10 000 lat temu. To może być przyczyną niebieskiego koloru oczu wszystkich żyjących dzisiaj ludzi. Uważa się, że niektórzy Sumerowie mogli mieć niebieskie oczy. Ta niebieska pigmentacja w oczach mogła być wyraźnym znakiem od bogów. A przynajmniej tak twierdzili w czasach starożytnych. Znaleziono serię sumeryjskich posągów, w których ich oczy są obrysowane intensywnym błękitem. Pamiętajmy, że Sumerowie to cywilizacja, która dała nam historię Anunnaki, możliwych bogów stwórców ludzkości i całą historię pełną alternatywnych teorii. Niezależnie od tego, czy jest to wiara, czy nie, wiele kultur na całym świecie uważa, że kolor niebieskich oczu jest wyraźnym znakiem boskości. Unikalna mutacja genetyczna... dziwne wydarzenie, które nadal ma miejsce w skrajnie odizolowanych plemionach... Z drugiej strony, według Sir Wallisa Budge'a, „przeddynastyczni Egipcjanie należeli do rasy białej lub o jasnej karnacji i jasnych włosach; byli pod wieloma względami podobni do starożytnych Libijczyków. Nie jest to coś bardzo dziwnego, ponieważ na obrazach egipskich Libijczycy byli białymi ludźmi o blond lub rudych włosach, niebieskich oczach i nordyckich rysach twarzy. El Portal De Anubis By studying the Sumerian religion, scientists at the University of Copenhagen discovered a genetic mutation that happened around 6,000 to 10,000 years ago. This could be the reason why the eyes of all people alive today are blue. It is believed that some Sumerians may have had blue eyes. That blue pigmentation in the eyes might have been a clear sign from the gods. Or at least that's what they said in ancient times. A series of Sumerian statues have been found in which their eyes are outlined in an intense blue. Remember that the Sumerians are the civilization that gave us the history of the Anunnaki, the possible creator gods of mankind, and a whole history full of alternative theories. Whether it is faith or not, many cultures around the world believe that the color of blue eyes is a clear sign of divinity. Unique genetic mutation ... a strange event that still takes place in extremely isolated tribes ... On the other hand, according to Sir Wallis Budge, "the pre-dynastic Egyptians were white or fair-skinned and fair-haired; they were in many ways similar to the ancient Libyans. This is not something very strange, because in Egyptian paintings the Libyans were white people with blonde or red hair, blue eyes and Nordic facial features. El Portal De Anubis Изучая шумерскую религию, ученые из Копенгагенского университета обнаружили генетическую мутацию, которая произошла примерно 6000–10 000 лет назад. Это может быть причиной того, что глаза всех живущих сегодня людей голубые. Считается, что у некоторых шумеров могли быть голубые глаза. Эта синяя пигментация глаз могла быть явным знаком богов. По крайней мере, так говорили в древности. Была найдена серия шумерских статуй, глаза которых обведены ярко-синим цветом. Помните, что шумеры - это цивилизация, которая дала нам историю аннунаков, возможных богов-создателей человечества, и целую историю, полную альтернативных теорий. Будь то вера или нет, многие культуры по всему миру верят, что цвет голубых глаз является явным признаком божественности. Уникальная генетическая мутация ... странное событие, которое до сих пор происходит в крайне изолированных племенах ... С другой стороны, по словам сэра Уоллиса Баджа, «додинастические египтяне были белыми или светлокожими и светловолосыми; они во многом были похожи на древних ливийцев. В этом нет ничего странного, потому что на египетских картинах ливийцы были белыми людьми со светлыми или рыжими волосами, голубыми глазами и нордическими чертами лица. Эль Портал Де Анубис Durch das Studium der sumerischen Religion entdeckten Wissenschaftler der Universität Kopenhagen eine genetische Mutation, die vor etwa 6.000 bis 10.000 Jahren auftrat. Dies könnte der Grund dafür sein, dass die Augen aller heute lebenden Menschen blau sind. Es wird angenommen, dass einige Sumerer blaue Augen hatten. Diese blaue Pigmentierung in den Augen könnte ein klares Zeichen der Götter gewesen sein. Zumindest sagten sie das in der Antike. Es wurde eine Reihe sumerischer Statuen gefunden, bei denen ihre Augen in einem intensiven Blau umrandet sind. Denken Sie daran, dass die Sumerer die Zivilisation sind, die uns die Geschichte der Anunnaki, der möglichen Schöpfergötter der Menschheit, und eine ganze Geschichte voller alternativer Theorien gegeben hat. Ob Glaube oder nicht, viele Kulturen auf der ganzen Welt glauben, dass die Farbe blauer Augen ein klares Zeichen der Göttlichkeit ist. Einzigartige genetische Mutation ... ein seltsames Ereignis, das immer noch in extrem isolierten Stämmen stattfindet ... Auf der anderen Seite, so Sir Wallis Budge, „waren die vordynastischen Ägypter weiß oder hellhäutig und blond; sie waren den alten Libyern in vielerlei Hinsicht ähnlich. Das ist nicht sehr seltsam, denn in ägyptischen Gemälden waren die Libyer weiße Menschen mit blonden oder roten Haaren, blauen Augen und nordischen Gesichtszügen. El Portal De Anubis
: Data Publikacji.: 14-07-26
© Web Powered by Open Classifieds 2009 - 2026